01
Overview
Retrig MP Trigger is a drum trigger plugin for replacing, reinforcing and layering drums directly from audio. It listens to the incoming drum track, detects transient attacks and plays loaded samples with velocity and round-robin variation.
The plugin is useful when you need to reinforce a performance without losing the drummer's dynamics, replace a weak kick, snare or tom, add attack, body or room tone, stabilize a dense mix, or preserve ghost notes and rolls with controlled velocity response.
02
Quick Start
- 1Insert the plugin on a close-mic drum track: kick, snare, tom or percussion.
- 2If the plugin is not activated, click ACTIVATE, enter your license key and confirm activation.
- 3Use the UI scale control in the bottom-right corner to choose 100%, 150% or 200%.
- 4Click SAMPLES, choose audio files, add them to BIN with ADD SEL or ADD ALL, then press LOAD BIN.
- 5Start DAW playback and watch the scope and sample matrix.
- 6Set THRESHOLD above bleed and noise, but below real drum hits.
- 7Set HOLD longer if double triggers appear; use shorter values for fast rolls.
- 8Set DEPTH higher for ghost notes, or lower if bleed starts triggering samples.
- 9Check PHASE, especially when MIX is below 100% and the dry mic remains audible.
- 10Adjust MIX and OUTPUT so the sample sits in the mix without clipping.
| Source | THRESHOLD | DEPTH | HOLD | HPF | LPF | MIX |
|---|---|---|---|---|---|---|
| Kick close mic | 45-65 | 35-55 | 35-80 ms | 30-70 Hz | 3-8 kHz | 50-100% |
| Snare close mic | 45-70 | 45-70 | 20-60 ms | 80-180 Hz | 6-12 kHz | 25-100% |
| Toms | 45-70 | 35-60 | 80-160 ms | 50-120 Hz | 4-10 kHz | 40-100% |
| Ghost-note snare | 35-55 | 65-90 | 12-35 ms | 100-200 Hz | 8-16 kHz | 25-70% |
These values are starting points, not rules. Bleed, tuning, performance, room sound and transient shape all change the best setting.
03
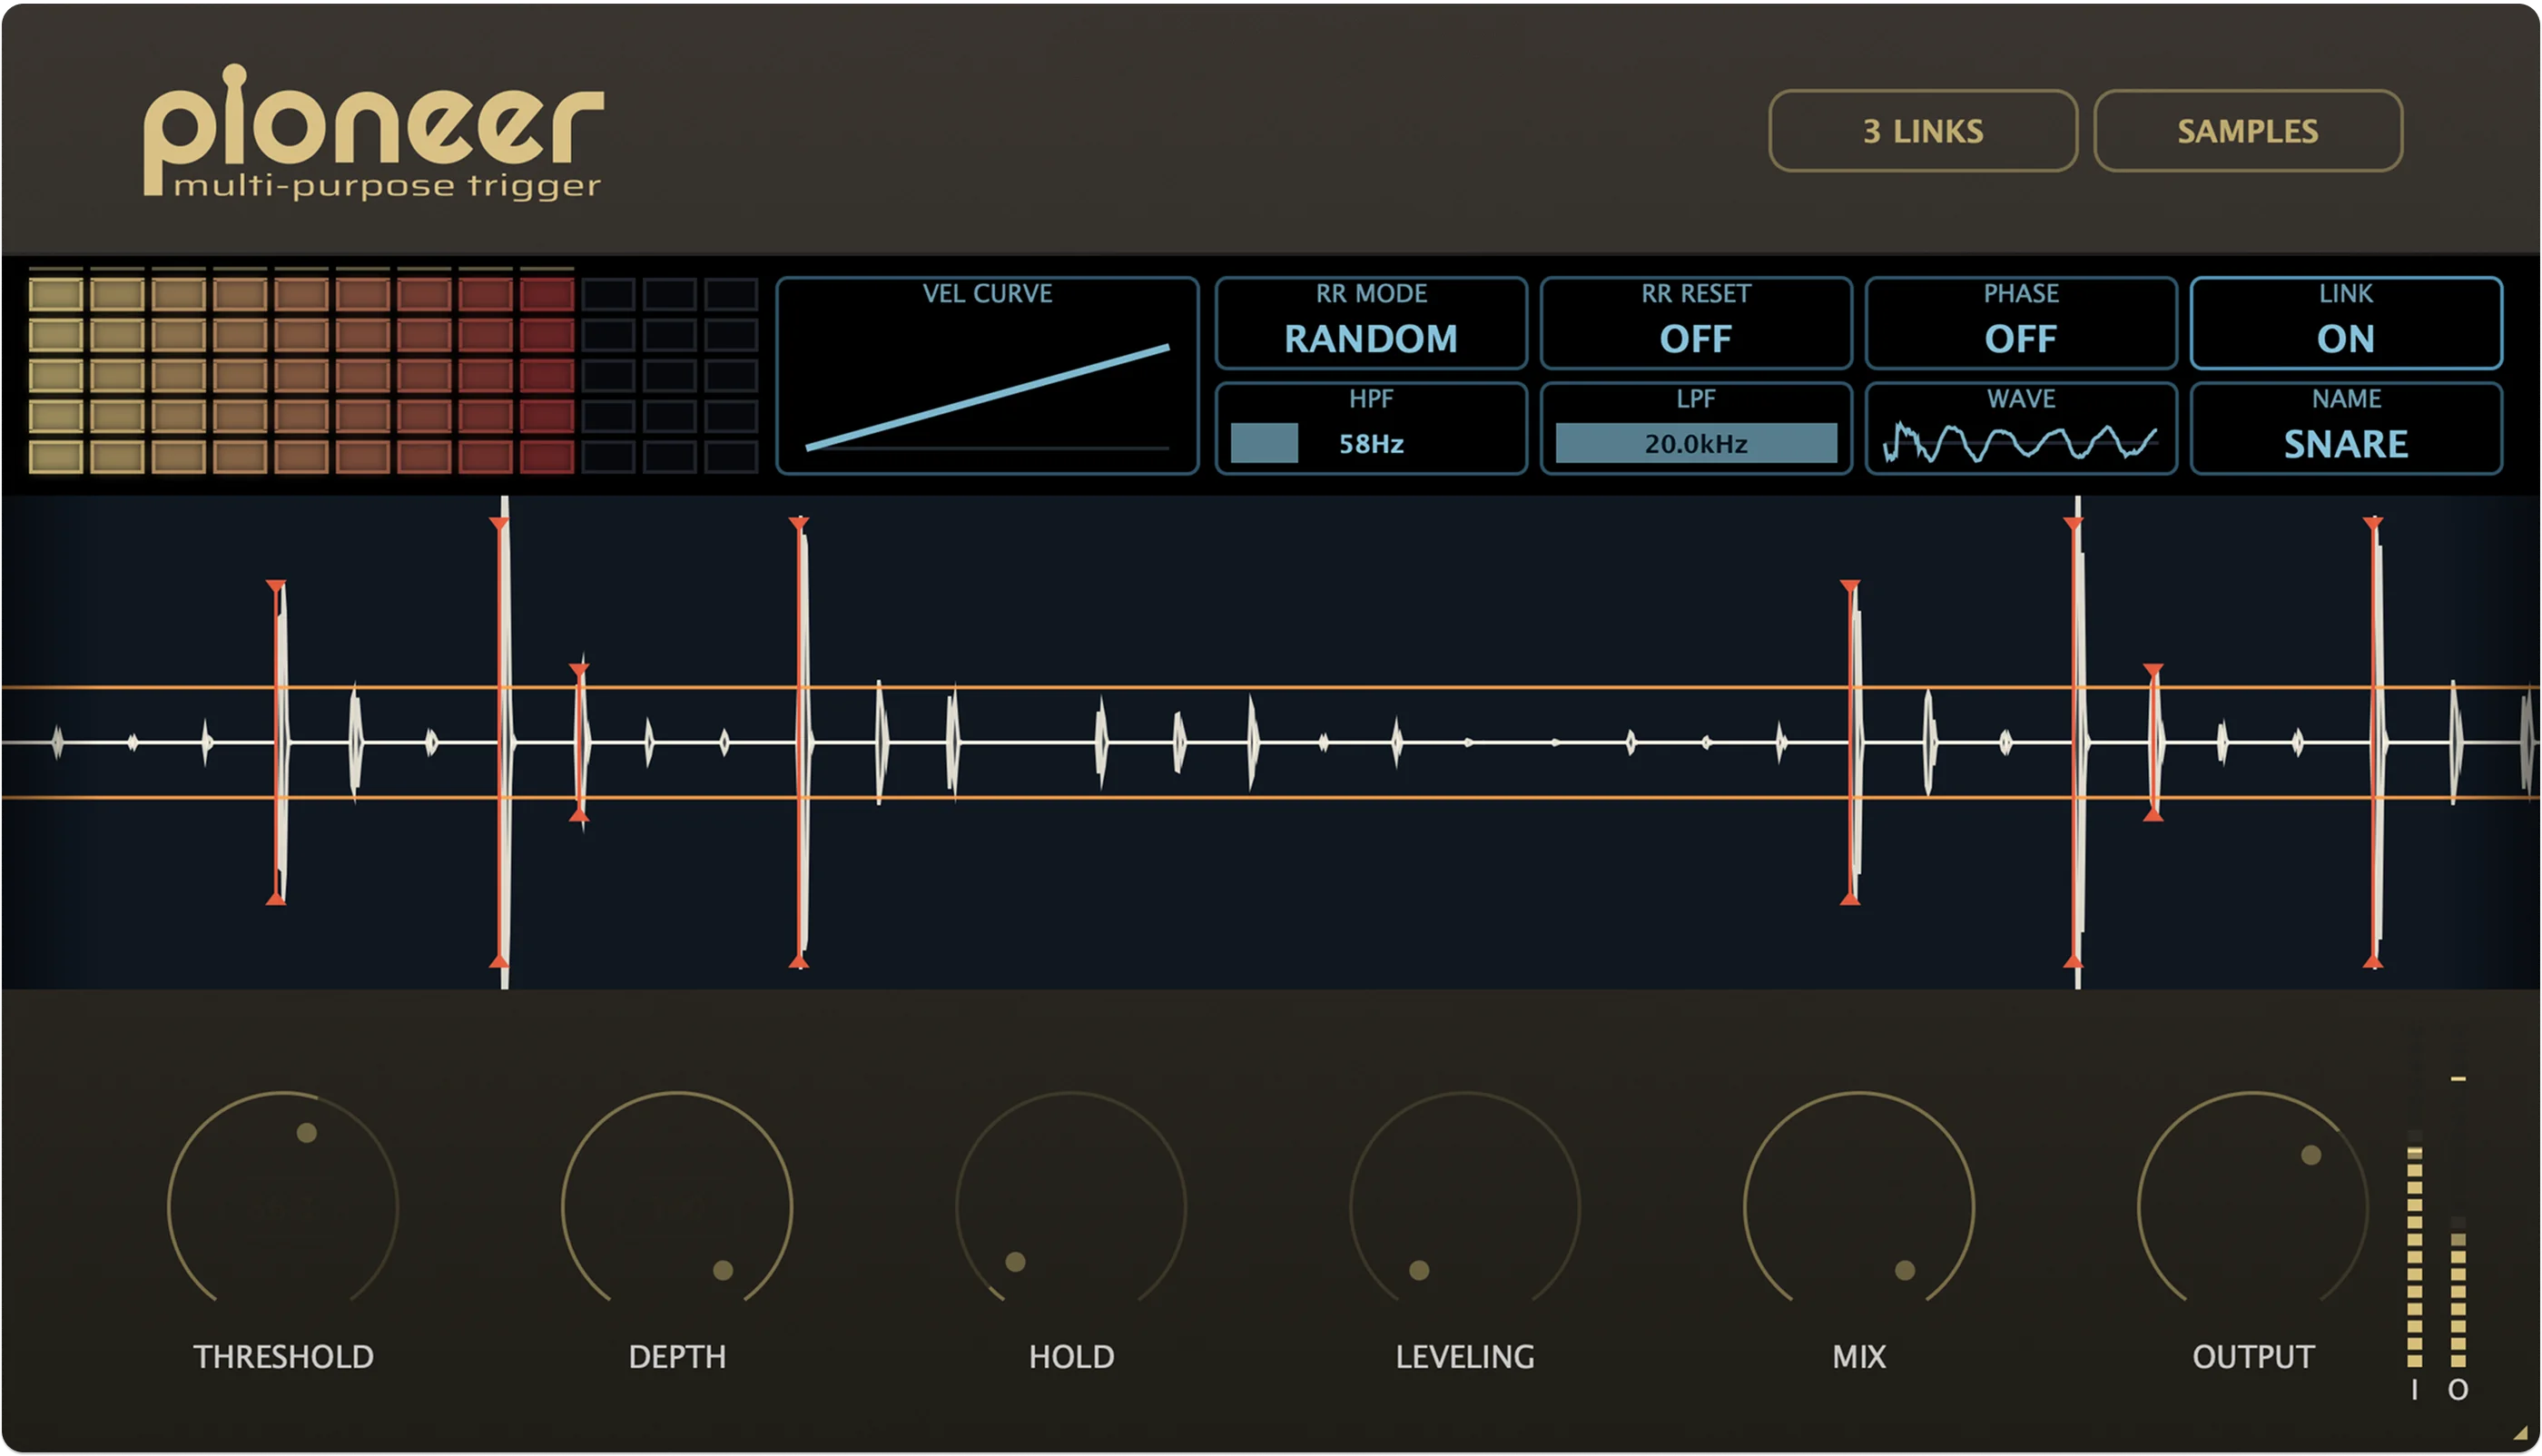
Interface Map
The interface is built around four working areas: the top bar with SAMPLES, ACTIVATE, LINK, UI scale and about access; the main controls; the diagnostic area; and status indicators for round-robin, phase, filters, LINK, NAME and WAVEFORM.
The main idea is to tune detection through visual feedback rather than hidden menus. The scope shows what the detector sees, the matrix shows which sample layer fired, meters show input and output level, and the waveform preview helps check sample shape and polarity.
| Action | Result |
|---|---|
| Drag knob | Adjust the main parameter. |
| Double-click | Reset supported controls to their default value. |
| Click indicator | Switch modes such as RR, phase or LINK. |
| Horizontal drag | Adjust HPF or LPF frequency. |
| Drag matrix handles | Limit the playable velocity range. |
| Click or drag matrix cells | Preview loaded sample layers. |
| Drag-and-drop files | Load supported samples into the browser or matrix. |
| Option/Alt-click matrix | Clear loaded samples. |
| Hover | Show contextual help for the UI area. |
04
Sample Browser

Open the browser with SAMPLES. It lets you navigate folders, preview audio files, stage files in BIN and then apply them to the matrix with LOAD BIN.
Supported formats are WAV, AIF, AIFF, FLAC and MP3. Directories open with a click, the path bar shows the current folder, PLACES gives quick access to common locations, and the back and UP controls move through browsing history.
BIN is a staging area. Adding files to BIN does not change loaded samples until you press LOAD BIN. Double-clicking an audio file also adds it to BIN. Dropped files are staged in the same way.
| Button | Action |
|---|---|
| ADD SEL | Add selected audio files to BIN. |
| ADD ALL | Add all supported audio files from the current folder. |
| REMOVE | Remove selected files from BIN. |
| CLEAR | Clear BIN without changing currently loaded slots. |
| LOAD BIN | Apply BIN to the sample matrix and run sorting. |
| CANCEL | Close the browser without applying changes. |
05
Preparing Sample Sets
The plugin can work with one sample, but it is most expressive with multi-layer sets: several velocity layers, several round-robin variations per layer, and samples that cover different attack and body characteristics.
On LOAD BIN, Retrig MP Trigger analyzes and sorts the samples. If velocity tags are present, they take priority. Without tags, samples are grouped by loudness and attack behavior, so quieter hits become lower velocity layers and louder hits become upper layers.
Velocity tags
vel01, vel02, vel10
_v01, _v02, _v10
-v01, -v02, -v10
 v01,  v02,  v10
Round-robin tags
rr01, rr02, rr03
_r01, _r02, _r03
-r01, -r02, -r03
 r01,  r02,  r03
Snare_vel01_rr01.wav
Snare_vel01_rr02.wav
Snare_vel02_rr01.wav
Snare_vel02_rr02.wav
Kick_v03_r01.wav
Kick_v03_r02.wav06
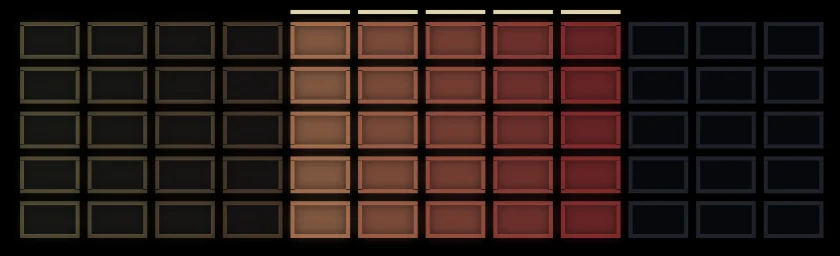
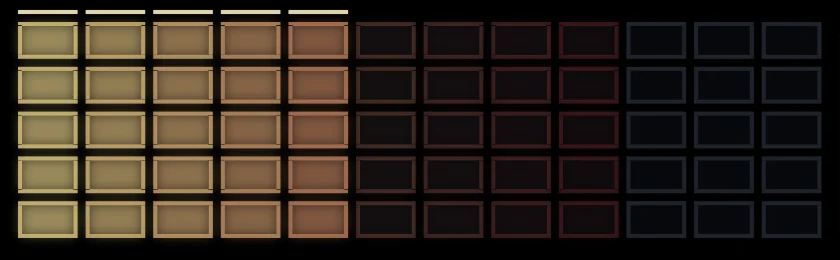
Sample Matrix

The sample matrix is the center of playback feedback. Columns represent velocity layers, rows represent round-robin variations, bright cells are active loaded slots, dimmed cells are outside the selected velocity range, and flashes show the layer that was just triggered.
Click a cell to preview its layer. Drag across the matrix to audition several cells quickly after loading a set. The UI shows up to 12 velocity columns and 5 variation rows, while the engine can still manage larger sets internally.
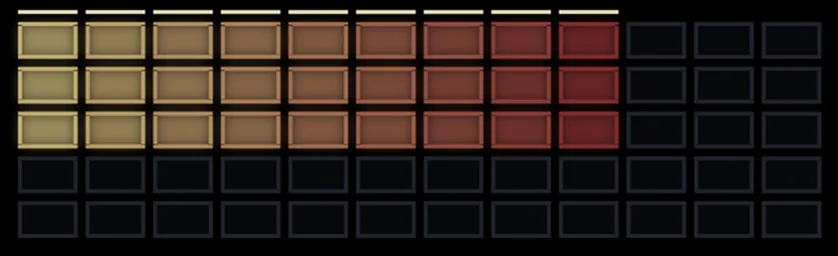
Use the range handles when you only want hard hits, need a softer replacement, or want to exclude noisy low layers during parallel reinforcement. Option/Alt-click the matrix to clear loaded samples and BIN.
07
Core Triggering Controls
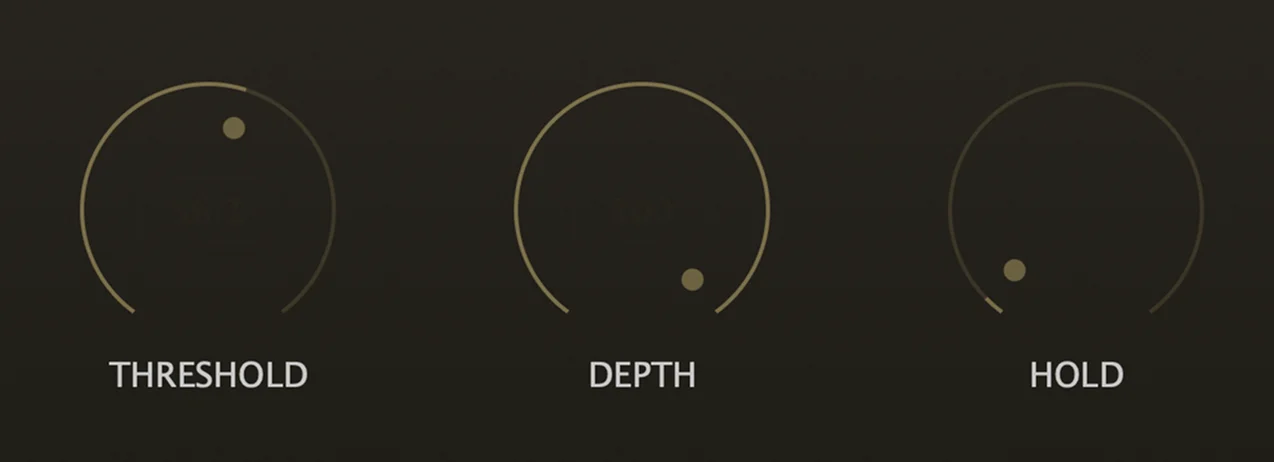
THRESHOLD, DEPTH and HOLD work together. Set them in context while listening to the drum track and watching the scope.
THRESHOLD
Defines the level below which samples do not trigger. Use it as the boundary between useful hits and bleed or noise.
DEPTH
Controls how willingly the detector accepts weaker transient detail. Raise it for ghost notes; lower it when bleed becomes too active.
HOLD
Sets the minimum time between accepted hits. Use longer values against double triggers and shorter values for rolls.
Practical HOLD ranges: 8-25 ms for fast snare rolls, 20-60 ms for normal snare performance, 35-90 ms for kick and 80-160 ms for toms.
08
Input Filtering: HPF and LPF

HPF and LPF are detector filters. They do not act as output EQ; they change what the detector hears when it decides whether to trigger.
HPF
Removes low frequencies from the detector path. Use it on snare to reduce kick bleed, on toms to avoid rumble, and on percussion where low-end is not part of the attack.
LPF
Removes high frequencies from the detector path. Use it when hi-hat bleed, cymbal wash or clicky upper information causes false triggers.
Drag horizontally on HPF or LPF to change frequency. Double-click to reset. Defaults are HPF 58 Hz and LPF 20.0 kHz.
09
Velocity, Leveling and Dynamics
Retrig MP Trigger estimates the strength of the incoming transient and selects the matching velocity layer. Stronger hits trigger harder layers, while quieter hits trigger softer layers.

Low LEVELING preserves natural soft and hard differences. High LEVELING creates a more stable output for dense modern mixes. Start at 0% when you want natural dynamics, and raise it only when the sample track jumps too much in the mix.


Drag up or down on the velocity curve panel to change response. Positive curves push soft hits into harder layers sooner. Negative curves make hard hits less aggressive. Use the curve after detection is stable.
10
Round-Robin Variation

Round-robin playback reduces the machine-gun effect by rotating through variations instead of repeating one sample.
| Mode | What it does | Use when |
|---|---|---|
| CYCLE | Moves through variations in order. | Predictable natural playback. |
| RANDOM | Chooses a variation randomly. | A looser, more human response. |
| NOREP | Random choice without immediate repeat. | A safe default for fast repeated hits. |
| Reset | What it does | Use when |
|---|---|---|
| OFF | Round-robin state keeps running. | Long continuous playback. |
| HOST | Resets when host playback position resets. | Repeatable DAW playback. |
| TIMEOUT | Resets after a period without hits. | More stable phrase starts. |
HOST is the default reset mode. It gives repeatable playback behavior when you restart the DAW transport.
11
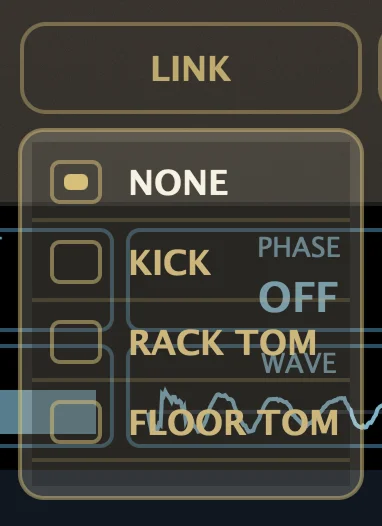
Phase, Waveform, Mix and Output
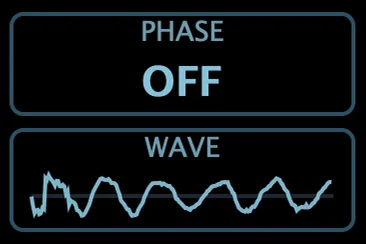
PHASE inverts the polarity of the triggered sample. It matters most when MIX is below 100% and the dry mic remains in the signal. Set MIX around 50%, switch PHASE, and keep the position where the drum sounds fuller rather than thinner.
WAVEFORM previews the loaded sample around its main attack. If PHASE is on, the preview reflects the polarity change.
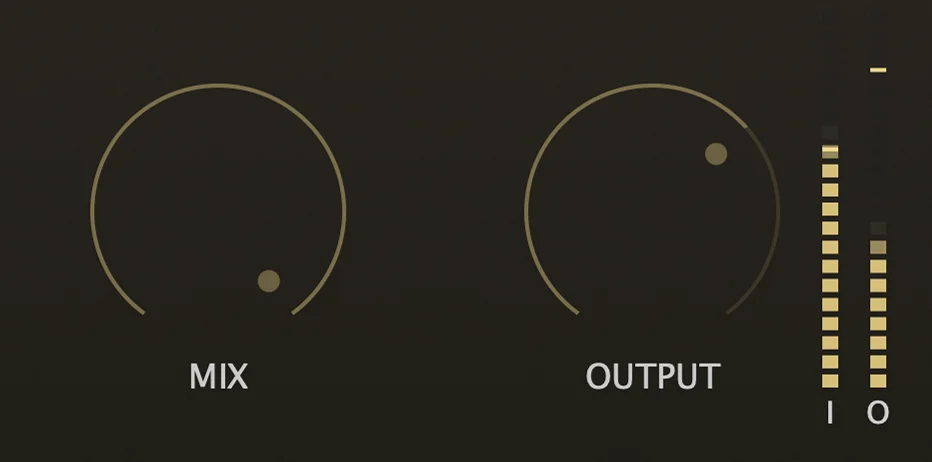
MIX controls dry/wet balance: 0% is dry input, 50% blends dry and sample, and 100% is the triggered result. OUTPUT is the final gain after playback and mix, from -24 dB to +12 dB.
12
LINK and Bleed Control
LINK is for sessions with several plugin instances. It lets instances know about each other and use other drum events as context for bleed control.
1. Open LINK from the top controls
Use the LINK button after naming your instances, so the target track is easy to identify.

2. Check the active LINK state
The LINK indicator shows whether the current instance is using linked drum context.

3. Select remote instances
Choose one or more plugin instances that may create bleed on the current microphone.
- 1Insert Retrig MP Trigger on several drum tracks.
- 2Give each instance a clear NAME, such as Kick, Snare Top or Tom 1.
- 3On the target instance, click LINK.
- 4Select other instances that may create bleed.
- 5After selection, use the LINK indicator to switch ON or OFF.
LINK does not replace proper THRESHOLD, DEPTH, HOLD and filter setup. It is an additional tool for difficult multi-mic drum sessions where you need dynamic detail without bleed triggers.
13
Scope and Visual Diagnosis

Watch for activity between hits, trigger markers, repeated events after a single hit, the effect of HPF/LPF changes and whether matrix flashes match the actual performance.
| Observation | Likely cause | What to adjust |
|---|---|---|
| Flashes appear between real hits | Threshold is low, Depth is high or bleed is inside the detector band. | Raise THRESHOLD, lower DEPTH and tune HPF/LPF. |
| Ghost notes do not trigger | Threshold is too high or Depth is too low. | Lower THRESHOLD slightly or raise DEPTH. |
| One hit creates two flashes | Hold is too short, or resonance looks like a new attack. | Increase HOLD and check detector filters. |
| Fast rolls lose hits | Hold is too long. | Reduce HOLD for the fast passage. |
| Kick triggers the snare instance | Low-end bleed is reaching the snare detector. | Raise HPF on the snare instance. |
| Hi-hat triggers the snare | High-frequency bleed is too active. | Lower LPF, raise THRESHOLD or reduce DEPTH. |
| Blend sounds thin | Phase cancellation between dry mic and sample. | Toggle PHASE and compare at around 50% MIX. |
| Velocity is always hard | Curve, range or Leveling are too aggressive. | Soften the curve, widen range and lower LEVELING. |
Meters tell you how loud the input and output are. The scope tells you how the detector understands the transient. If the meter shows a strong hit but no trigger occurs, the detector band may be filtered poorly or THRESHOLD may be too high.
14
Practical Workflows
Natural Snare Reinforcement
Keep the original performance while adding body and consistency.
- Load a snare pack with several velocity layers.
- Set MIX around 30-60%.
- Raise THRESHOLD until hi-hat bleed stops triggering.
- Increase DEPTH until ghost notes return.
- Use HOLD around 20-45 ms.
- Check PHASE and keep LEVELING low or medium.
Full Snare Replacement
Replace the close mic with a controlled sample track.
- Load a balanced snare sample set.
- Set MIX to 100%.
- Place THRESHOLD above bleed.
- Use only as much DEPTH as needed for ghost notes.
- Choose NOREP or CYCLE for round-robin playback.
- Trim velocity range if soft layers are not useful.
Kick Click Layer
Add attack without replacing the whole kick sound.
- Load a short click or hard kick layer.
- Limit the matrix to the upper velocity columns.
- Set MIX around 10-40%.
- Tune HPF/LPF so the detector follows the kick.
- Check PHASE, even if the layer is mostly click.
Tight Tom Replacement
Make toms cleaner and more consistent.
- Insert a separate instance on each tom track.
- Load tom samples matching the drum size and pitch.
- Use HOLD around 80-160 ms.
- Tune HPF and LPF against cymbal wash.
- Link tom instances when bleed makes triggering unstable.
- Use MIX between 40-100% depending on the source recording.
Ghost-Note Sensitive Snare
Catch soft notes without opening the door to hi-hat bleed.
- Find a section with ghost notes and hi-hat bleed.
- Use a short HOLD around 12-30 ms.
- Raise HPF to remove kick low-end.
- Lower LPF if the hi-hat is too sharp.
- Set THRESHOLD close to the bleed boundary.
- Raise DEPTH until ghost notes appear.
Modern Consistent Replacement
Create a dense, stable production sound.
- Use multi-layer samples without too many soft layers.
- Limit velocity range if the performance is uneven.
- Raise LEVELING.
- Use NOREP.
- Set MIX around 80-100%.
- Match OUTPUT to the drum bus.
15
Troubleshooting
No triggers
- The plugin is activated.
- Samples are loaded with LOAD BIN.
- MIX is not at 0%.
- THRESHOLD is not too high.
- The DAW track is feeding audio into the plugin.
- The track is not bypassed or muted.
Samples do not load
- License status is active.
- The file format is supported.
- The files still exist at their saved paths.
- You pressed LOAD BIN, not only ADD SEL.
- BIN is not empty unless you intend to clear the matrix.
Too many false triggers
- Raise THRESHOLD.
- Lower DEPTH.
- Increase HOLD.
- Tune HPF/LPF for the drum.
- Use LINK when false triggers are caused by other close mics.
Ghost notes disappear
- Lower THRESHOLD in small steps.
- Raise DEPTH.
- Reduce HOLD for close ghost-note patterns.
- Check that velocity range is not limited to hard layers only.
Activation failed
- Check the license key format.
- Confirm the internet connection.
- Check system time.
- Remove spaces before or after the key.
- Copy Machine ID from the about overlay when contacting support.
16
Reference Appendix
| UI label | Parameter | Range / default | Meaning |
|---|---|---|---|
| THRESHOLD | detail | 0-100 / 50 | Minimum level required for triggering. |
| DEPTH | sensitivity | 0-100 / 50 | Detection depth for quieter transient details. |
| HOLD | retrigger | 8-250 ms / 15 ms | Minimum interval between accepted hits. |
| LEVELING | leveling | 0-100% / 0% | Dynamic smoothing for triggered samples. |
| MIX | mix | 0-100% / 100% | Dry/wet balance. |
| OUTPUT | output | -24 to +12 dB / 0 dB | Final output gain. |
| UI label | Values / range | Interaction |
|---|---|---|
| RR MODE | CYCLE, RANDOM, NOREP | Click to cycle. |
| RR RESET | OFF, HOST, TIMEOUT | Click to cycle. |
| PHASE | ON, OFF | Click to toggle. |
| HPF | 24-2000 Hz / 58 Hz | Horizontal drag, double-click reset. |
| LPF | 1-20 kHz / 20 kHz | Horizontal drag, double-click reset. |
| LINK | ON, OFF | Click to toggle after selecting linked instances. |
| NAME | Instance display name | Click to edit, Enter to commit, Escape to cancel. |
| WAVE | Sample transient preview | Visual reference. |
Sample naming
Instrument_vel01_rr01.wav
Instrument_vel01_rr02.wav
Instrument_vel02_rr01.wav
Instrument_vel02_rr02.wav
Supported formats
.wav
.aif
.aiff
.flac
.mp3
The plugin saves parameter values, selected sample file paths, the last browser directory, LINK instance id/name, selected LINK targets and the UI scale preset in the DAW session. If sample files are moved later, the plugin may not find them when the project is reopened.
ACTIVATE opens the activation window. Enter the license key, confirm activation and the plugin will store local activation state for this machine. Click the logo to open the about/license overlay, where you can view the plugin version and Machine ID.
RESET ACTIVATION clears local activation state on this machine. Use it when you need to activate again, change license state or recover from damaged local state.
Need help?
For support, include your DAW, operating system, plugin version and Machine ID from the about overlay.
Contact Support